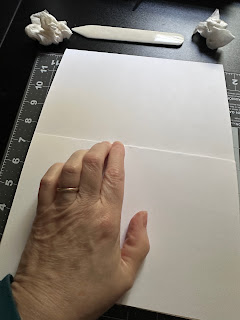
Today's tasks are to finish work on the binding. It must seem like a lot of work has gone into this process. But honestly, it's not that complicated and very enjoyable if you enjoy glue. It's now time to work on gluing the end pages to the text block. The end pages are shaped like a greeting card. They are the same size as the text block and are used to glue the text block (the reading pages) to the cover pieces.
For this process, I needed to glue a small strip on the end pages' edge. You can see from the photo there is approximately a 16th of an inch exposed for the glue.
 |
| Gluing the end pages |
I the put the back end page on the text block making sure I pressed down on the outside and the inside for a firm grip. Then again the same process for the front end page. The photo shows what the book would look like when turned horizontally and open. Because the edge of the text block with new end pages won't be pressed within the press while it dries, making sure it stays put is important.
 |
| Pressing the end page well |
You can see in this next picture what the end result looks like. It's clear to see the end page however, we're not putting it away yet.
 |
| It's beginning to look like a book! |
This next and final treatment of the binding process includes something called "mull" or binding tape. It's not really tape, but an acid free mess cloth material that is a little stiff. I purchased this from a book binders company called Hollander's. I like supporting places like this because let's face it, Amazon is a beast that imposes such a disruption for competitors it's criminal. Mine came in a 2 yard by 18" wide swath.
 |
| Mull or bookbinders tape |
I then measured out the length of the text block making sure I left a few millimeters on each end free of the tape. The width is determined by how much you want to have to glue to the end pages. It was advised in the tutorial I am following to allow no wider than 2 cm or 3/4 of an inch for the over hang.
At this point I clamped the text block into the press with around 2 inches included in the binding to hang out. More glue is added to the binding, but not on the end pages yet.
 |
| Glue applied as well as mull |
Pressing down hard on the mulled binding I then had to apply more glue to the end pages where the mull would be laying over them. It was easily achieved by tilting the press and applying glue to the end pages. I then worked down the mull over the edge to the end pages on both sides simultaneously so the mull would be evenly applied to the end pages.
 |
| The end result |
It's an exiting process to watch come together. There is one step that I have decided not to do after this. On one tutorial you are instructed to "round" the edges of the binding using a hammer. It's a gentle process that softens the edges. I've decided my edges are rounded enough from my own process. The next step is quite exciting. We will be working on creating the cover! So please stay tuned.
Disclaimer, I am a total newbie artist and crafter. The process of book binding here you read about is knowledge I've learned through YouTube videos. At the end of the project, I'll be posting those videos I found helpful.
No comments:
Post a Comment